

As part of the Bronze Boomerang, Cubs are required to know how to tie a shoe lace. There are many ways to tie them, and we have no particular requirement for which one. Click on the picture below to go to "Ian's Shoelace Knots" website and try out whichever one suits you best!


The reef knot is very simple, sits very flat and is easy to undo. One major usage is in first aid, when tying slings, because the flat knot doesn't dig into the patient. There are a couple of incorrect variations. One is where the two ends do not come out of the same side of the loop on each side of the knot and a 'Thief knot', where the rope ends don't come out both at the top or both at the bottom of the knot (the story is that sailors used to tie their belongings with a thief knot so that if someone went through them and then retied with a reef knot, they'd know it had been tampered with... is it true? who knows!).
 Animation Animation
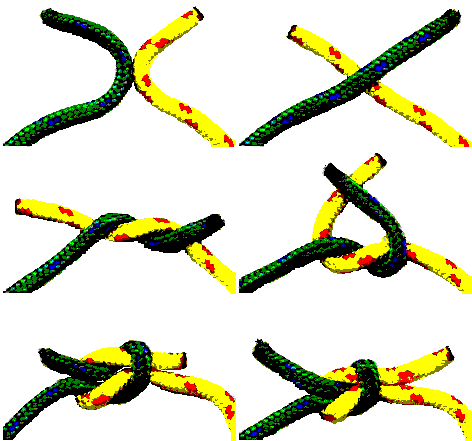
 Step by Step Step by Step

The sheetbend is used to join two ropes of different thickness
 Animation Animation
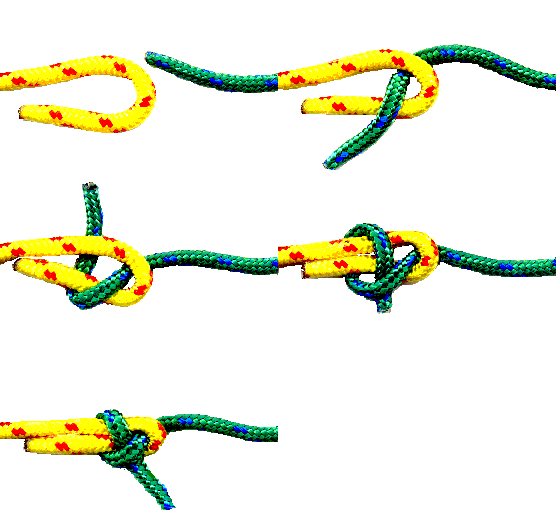
 Step by Step Step by Step

The clove hitch is used to start off many lashings and to tie off a rope. For example, when tying down a load on a trailer, the rope will firstly be tied with a clove hitch, before being tightened at the other end.
 Animation Animation
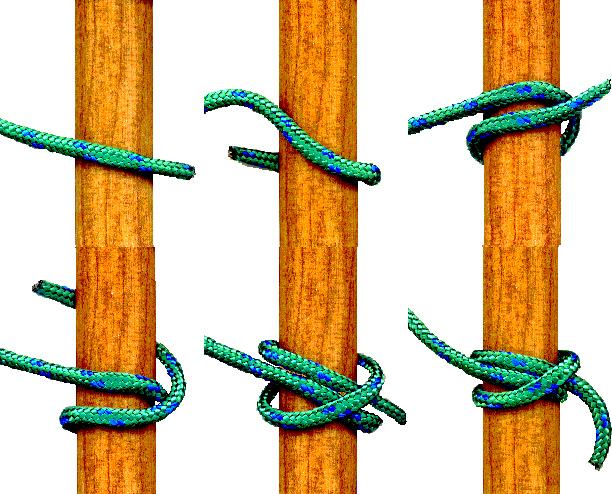
 Step by Step Step by Step

The bowline gives a loop that won't slip and get smaller. Although emergency services would, these days, use things such as harnesses, a bowline could, for example, be sat in by a person as they're hauled up a cliff.
 Animation Animation
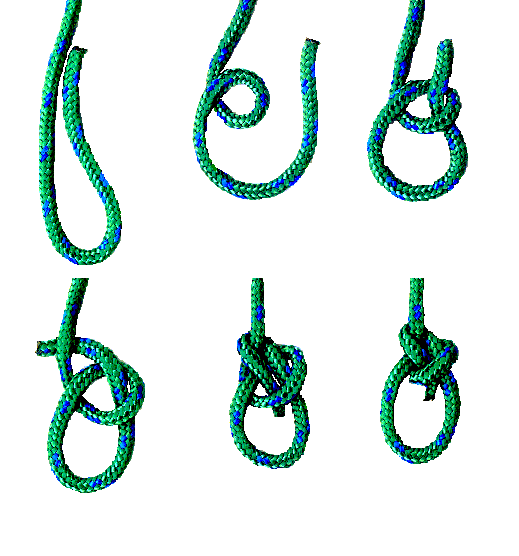
 Step by Step Step by Step
We are indebted to Alan Folsom for giving us permission to reproduce these knots from his excellent site: Click here.

In the Gold Boomerang Ropes test, Cubs are required to make a gadget using at least one type of appropriate lashing. Probably the most common lashing is the square lashing. This is used to lash two poles together. If it's tied well, it will withstand heavy usage, but if done poorly it will be likely to cause lots of frustration!
 Step by Step Step by Step
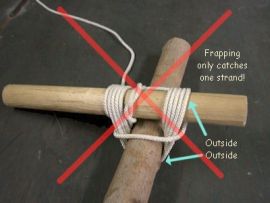
Why the Inside-Outside Rule.
If you do not pay attention to how you lay the ropes you will generally end up simply going to the outside. When you do that, the frapping will only catch the outer wrap and the lashing will loosen quickly. |
Thanks to Glenn Cockwell from Canada, for allowing us to reproduce his square lashing info.
See his site here.

A rope obviously has ends and a middle. The end you're working with is the working end and the rest of the rope is the 'standing line'. A bight is a bend in the rope that doesn't cross over itself... whereas a loop is a bend that does cross over.

Ropes need to be cared for properly, in order to last well and work safely.
Rope ends should be sealed in some way (melted, spliced etc.) to stop fraying.
Inspect ropes regularly for signs of damage or decay
Throw out ropes that are too damaged for use and be aware that a rope that's been jolted close to or beyond what should be their maximum strength may break at any time when tightened.
Pad ropes that are tightened around sharp corners or edges, to minimise the risk of damage
Try to keep the rope clean (don't drag through dirt). Muddy or dirty rope can be washed with water. The rope should be dried before being stored and should not be allowed to freeze. Excess dirt or grit can be shaken out of the rope once it has dried.
Always protect ropes from chemicals
Store ropes in a cool, dry place ventilated room, out of the sun. Coil and store neatly, keeping the rope off cement or metal floors.

The coil will be created in your left hand, in a clockwise direction (even if you're left handed, you should try to do this, because of the way most three-stranded ropes are twisted). Start with the rope's end in the left hand. Add to the coil by reaching out along the rope with your right hand (same distance each time). When you bring the rope into the coil, it may tend to twist into a figure eight. To minimise this problem, when you've stretched your right hand out, hold the rope with your palm facing outwards and give it a twist as if you were tightening a screw with a screwdriver. Then bring the rope in to transfer the part you were holding into your left hand.
When only around one coil length is left, wrap this a few times around the loop, giving the effect of a figure eight with a 'belt'. The actual end of the rope should be looped through the upper part of the figure eight.
The requirements for the Ropes section of the Boomerang Badges can be found here. They can also be found on pages 19 (Bronze), 34 (Silver) and 49 (Gold)
of your yellow Australian Cub Scout Record Book
|
|


